Laravel 5.3 Tutorial for beginners - Working with Laravel Socialite Plugin, how to Using Facebook Authentication For Login or register in Laravel 5.3? Laravel Sociallite Plugin can handle integration with facebook login/register, google plus, twitter, github login, etc.
I assume before doing this lessons, you must learn how to make auth in Laravel 5.3, please read Authentication Login & Registration Form + Bootstrap in laravel 5.3.
Using Facebook Authentication For Login in Laravel 5
First, we will create new Laravel project, read Create project in laravel 5.3Following this command
cd c:\server\htdocs
....
composer create-project --prefer-dist laravel/laravel sociallogin
Next, add new database, called "social_login"
Next, setup connection to your "social_login" database with configuration your .ENV file,
DB_CONNECTION=mysql
DB_HOST=127.0.0.1
DB_PORT=3306
DB_DATABASE=social_login
DB_USERNAME=root
DB_PASSWORD=yourpassword
Next, create Authentication Login & Registration Form that default from laravel 5.3, this tutorial hasbeen posted on this link.
or you can following this command
php artisan make:auth
Installing Socialite
How to install Socialite using composer? just following this command.
composer require laravel/socialite
Than, we nedd to add provider and aliases to the config/app.php file,
'providers' => [
    // Other service providers...
    Laravel\Socialite\SocialiteServiceProvider::class,
],
and add the aliases
'aliases' => [
    // Other service aliases...
    'Socialite' => Laravel\Socialite\Facades\Socialite::class,
],
Setting Facebook Login Apps
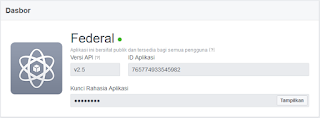
To create new facebook apps, goes here https://developers.facebook.com/ and create your app.On the app dashboard you will see all important data that we need for configuring Laravel Socialite.
Next, In the config/services.php folder add credentials for facebook app :
'facebook' => [
    'client_id' => '765774933545982', // configure with your app id
    'client_secret' => 'c79c7a2d24d3f828e62272cc51acdaaf', // your app secret
    'redirect' => '', // leave blank for now
    ],
Next, create new controller, create new cotroller following this command
php artisan make:controller SocialAuthController
In the SocialAuthController.php, we need two method like redirect() and callback().
<?php
namespace App\HttpControllers;
use Illuminate\Http\Request;
use App\Http\Requests;
use App\SocialAccountService;
use Socialite; // socialite namespace
class SocialAuthController extends Controller
{
    // redirect function
    public function redirect(){
      return Socialite::driver('facebook')->redirect();
    }
    // callback function
    public function callback(SocialAccountService $service){
      // when facebook call us a with token
    }
}
Next, add new routes,
Route::get('/redirect', 'SocialAuthController@redirect');
Route::get('/callback', 'SocialAuthController@callback');
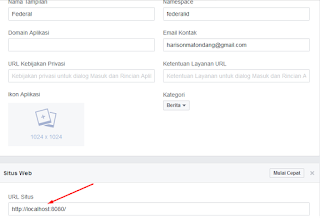
Now this is a part when we need to go back to the facebook configuration in service.php and update redirect url.
We are going to set this field to full url of the callback route. In our case when we are using PHP development server which is served on http://localhost:8080 by default, our final config/services.php will look like :
'facebook' => [
    'client_id' => '765774933545982', // configure with your app id
    'client_secret' => 'c79c7a2d24d3f828e62272cc51acdaaf', // your app secret
    'redirect' => 'http://localhost:8080/callback', // leave blank for now
    ],
After we have done, we need to create an facebook login link in Login page and that stored on \resources\views\auth\login.blade.php
Just add this code :
<a class="btn btn-link" href="redirect">Facebook Login</a>
Than, lets try your login apps by following this url and Click login using Facebook
http://localhost:8080/login
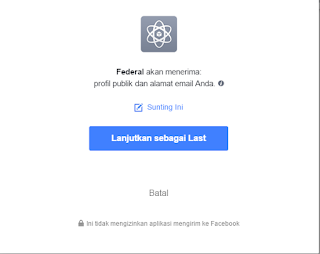
To get this app work at the first time, you need to confirm that you allow this app to use your data.
And if you allow this app, you will get nothing dor this step, we must continue to code.
Save All Facebook Data into Databases
First, we need to set the "password" to be "nullable" value in "...._create_users_table.php" migration, that will looking like this :
Schema::create('users', function (Blueprint $table) {
$table->increments('id');
$table->string('name');
$table->string('email')->unique();
$table->string('password')->nullable();
$table->rememberToken();
$table->timestamps();
Next, create new migration and new model by following this command :
php artisan make:migration create_social_accounts_table --create="social_accounts"
.........
php artisan make:model SocialAccount
Next, inde create_social_accounts_table migration, add this code
Schema::table('social_accounts', function (Blueprint $table) {
$table->integer('user_id');
$table->string('provider_user_id');
$table->string('provider');
$table->timestamps();
});
and run this command
php artisan migrate:refresh
Next, in our SocialAccount.php Model, add this code
<?php
namespace App;
use Illuminate\Database\Eloquent\Model;
class SocialAccount extends Model
{
  protected $fillable = ['user_id', 'provider_user_id', 'provider'];
  public function user()
  {
    return $this->belongsTo(User::class);
  }
}
Next, to can handling service that will try to register user or log in if account already exists. we need to Create new file like "SocialAccountService.php" and stored into "app" folder, than add this code
<?php
namespace App;
use Laravel\Socialite\Contracts\User as ProviderUser;
class SocialAccountService
{
    public function createOrGetUser(ProviderUser $providerUser)
    {
        $account = SocialAccount::whereProvider('facebook')
            ->whereProviderUserId($providerUser->getId())
            ->first();
        if ($account) {
            return $account->user;
        } else {
            $account = new SocialAccount([
                'provider_user_id' => $providerUser->getId(),
                'provider' => 'facebook'
            ]);
            $user = User::whereEmail($providerUser->getEmail())->first();
            if (!$user) {
                $user = User::create([
                    'email' => $providerUser->getEmail(),
                    'name' => $providerUser->getName(),
                ]);
            }
            $account->user()->associate($user);
            $account->save();
            return $user;
        }
    }
}
This soure will try to find provider's account in the databases and if it is not present it will create new user. This method will also try to associate social account with the email address in case that user already has an account.
Now everything is ready to handle facebook's callback to our app.
Last step, we just need to open our contoller "SocialAuthController" and with updated callback method it should look like this :
<?php
namespace App\Http\Controllers;
use Illuminate\Http\Request;
use App\Http\Requests;
use App\SocialAccountService;
use Socialite; // socialite namespace
class SocialAuthController extends Controller
{
    // redirect function
    public function redirect(){
      return Socialite::driver('facebook')->redirect();
    }
    // callback function
    public function callback(SocialAccountService $service){
      // when facebook call us a with token
      $user = $service->createOrGetUser(Socialite::driver('facebook')->user());
      auth()->login($user);
      return redirect()->to('/home');
    }
}
Now you can open your simple facebook login apps and try to login with your facebook.
Video tutorial Socialite Facebook Login in laravel 5.3
Next lessons, we will create login using google plus, twitter, github in laravel project.
See you next lessons...


Không có nhận xét nào:
Đăng nhận xét