Laravel 5 tutorial for beginners - Part3 how to working with socialite package in Laravel 5.3. This lessons is continued previews lessons about how to create login page in laravel using media social twitter login & facebook login.
Before create this project, we recomended you to read previews lesson about login using twitter and facebook, please read Login with Twitter & Facebook Socialite in Laravel 5.3.
Create Google, Twitter & Facebook Login in Laravel 5.3
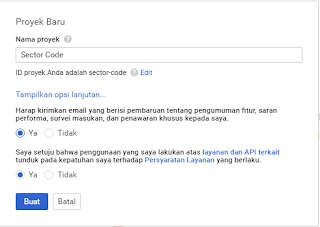
First, we must create Apps in goolge account, Create your app ini google console, go to this link Google Console.Create new project in Google Console
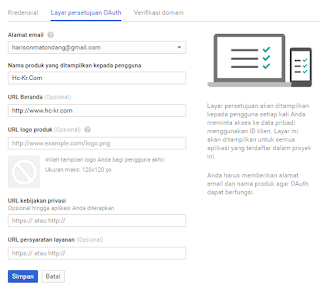
Next, we will configure our app, please Select Credentials submenu and then chose OAuth consent screen tab.
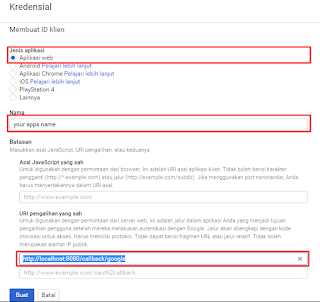
Next, we will create New credentials and OAuth client ID in Credentials tabs.
Next we will define our client as a client.
We will authorize our development url which is http://localhost:8080 and we will use like before callback route with google parameter: http://localhost:8080/callback/google.
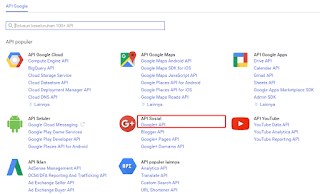
At the last step, we will enable Google + Api to get work in our login using google account later.
on the Api Google, click on Social Api (Google + Api)
Socialite Configuration
On your Laravel project, we need to add Google services, that stored on config/services.php
'google' => [
    'client_id' => '288493963032-qgusa1b3jtg5lv7rcg0lck55krirtcv9.apps.googleusercontent.com', // configure with your app id
    'client_secret' => 'ySrwsKOhvvWGRDpH8d5EvxEb', // your app secret
    'redirect' => 'http://localhost:8080/callback/google', // leave blank for now
    ],
Next, add google login in our auth login, that stored on our views folder.
@extends('layouts.app')
@section('content')
<div class="container">
    <div class="row">
        <div class="col-md-8 col-md-offset-2">
            <div class="panel panel-default">
                <div class="panel-heading">Login</div>
                <div class="panel-body">
                    <form class="form-horizontal" role="form" method="POST" action="{{ url('/login') }}">
                        {{ csrf_field() }}

                        <div class="form-group{{ $errors->has('email') ? ' has-error' : '' }}">
                            <label for="email" class="col-md-4 control-label">E-Mail Address</label>

                            <div class="col-md-6">
                                <input id="email" type="email" class="form-control" name="email" value="{{ old('email') }}" required autofocus>

                                @if ($errors->has('email'))
                                    <span class="help-block">
                                        <strong>{{ $errors->first('email') }}</strong>
                                    </span>
                                @endif
                            </div>
                        </div>

                        <div class="form-group{{ $errors->has('password') ? ' has-error' : '' }}">
                            <label for="password" class="col-md-4 control-label">Password</label>

                            <div class="col-md-6">
                                <input id="password" type="password" class="form-control" name="password" required>

                                @if ($errors->has('password'))
                                    <span class="help-block">
                                        <strong>{{ $errors->first('password') }}</strong>
                                    </span>
                                @endif
                            </div>
                        </div>

                        <div class="form-group">
                            <div class="col-md-6 col-md-offset-4">
                                <div class="checkbox">
                                    <label>
                                        <input type="checkbox" name="remember"> Remember Me
                                    </label>
                                </div>
                            </div>
                        </div>

                        <div class="form-group">
                            <div class="col-md-8 col-md-offset-4">
                                <button type="submit" class="btn btn-primary">
                                    Login
                                </button>

                                <a class="btn btn-link" href="{{ url('/password/reset') }}">
                                    Forgot Your Password?
                                </a>
                            </div>
                            <div class="col-md-8 col-md-offset-4">
                              <a class="btn btn-link" href="redirect/facebook">
                                  Facebook Login
                              </a>
                              <a class="btn btn-link" href="redirect/twitter">
                                  Twitter Login
                              </a>
                              <a class="btn btn-link" href="redirect/google">
                                  google Login
                              </a>
                            </div>
                        </div>
                    </form>
                </div>
            </div>
        </div>
    </div>
</div>
@endsection
Note :
if you got some error like "Error: redirect_uri_mismatch" just wait couple of minutes and it should work normally.
Video tutorial
Login with Google videos is realised as impossible..Create Socialite Facebook Login in laravel 5.3
Login with Twitter & Facebook Socialite in Laravel 5.3
See you next lessons .........


Không có nhận xét nào:
Đăng nhận xét